3 Cups Warm Water
1/3 Cup Honey ( maple syrup will work too)
1/3 cup Coconut Oil (Can be substituted)
Mix first ingredients together in a mixer ( I use the KitchenAid Pro)
Add to mixture
2 tbsp yeast ( Fasting acting)
1 Cup Sourdough Starter (unfed)
Mix well…then add to mixture
1 tbsp of sea salt or to your liking
7-9 cups of WW Flour
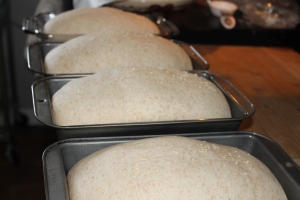
and keep mixing slowing with a paddle in the mixer and add the flour slowly. Add more flour as needed (up to about 7-9 cups in total) until sides of the bowl are pretty much cleaned off and the dough is all in one big ball of dough that isn’t sticking to your fingers. Add the dough paddle ( or knead on a floured board) knead for about 2-3 minutes. Flour amount all depends on the humidity where you live. I am in Central Canada and this is the amount I usually end up using. Once all in a ball of dough, you can transfer to a floured surface and knead for a couple of mins, depending on the amount you get after adding the flour, I usually can make 3 good size loaves. I usually weigh them on a digital scale and usually end up with about 750g each of dough to each pan. Cut the dough according to how much loaves you can make and knead them until you make a few nice round log looking loaves. Place each round of dough into a bread pan and make sure it is greased and I also like to add parchment paper to the bottom of the pans.
Let rise for about 30-60 mins. I cover them with a clean tea towel and then, I wait until they double in size.
Once doubled in size, I preheat oven to 400 F and I like to add a stone pan with water to the bottom rack for a bit of moister, then I pop all three bread pans on the top rack and bake for 40-45 minutes. Once done, pull them out of the oven – they should sound hollow if you tap on the top of the loaves and look honey brownish in colour when they are done.
Cool them on a rack for about 1 hour and then you can freeze them unsliced or sliced them once the complete cool off, usually, a couple of hours for me and I can slice them pretty easy and store them in a freezer bag. This way, when kids pop them out of the freezer, they smell as if I just baked them and they don’t cut them up and make a mess. 🙂
If you don’t want to add the yeast, you can omit it but you will need to let them rise pretty much the entire day – 8-10 hours as it is a slow rise with only the sourdough starter.
I have tried so many recipes from bloggers and youtube and friends, this is my own recipe and what worked for me. You can change the amount to suit your climate or your taste.
I hope you all enjoy it and send me pictures of your creations, recipes and any comments. I love trying new recipes and will share them with others as well.
If you guys want to have me make a youtube video on how I make it, let me know in comments and I will do so.
ENJOY!


 This is when I was 25 lbs heavier
  Me 25 lbs lighter